Posted by
Steve from College DownTime
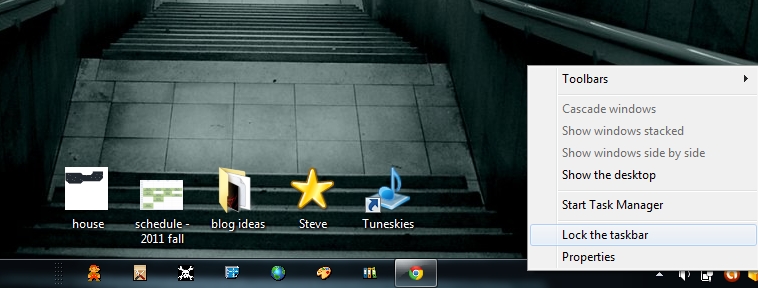
One of the most annoying aspects I found with my toolbar buttons was not being able to move them. I found the lack of movability quite disturbing. I knew there had to be a way, but where to start?
Start here:
1) Make an empty folder somewhere it will not be disturbed. I kept mine in
My Documents next to my
Stacks folder.
2) Make sure your toolbar is unlocked, right-click
Toolbars and then
New Toolbar. Select your empty folder and continue.
3) Right-click on your new toolbar icon and uncheck
Show Text and
Show Title. This makes the toolbar icon invisible.
4) Now just move the icon around as you want, adding other icons and/or stacks to the right of the invisible toolbar icon.
You can use this method of moving your icons to the center, or wherever along the toolbar. Some folks like to use their wallpaper in conjunction with their icons, so the center might not be the best option. Experiment and see what works for you!
I have a slight OCD condition which forced me to spend an hour or two measuring the centering of my icons down to the millimeter, but now I get all the chicks coming up to me wondering how my desktop looks so sleak. My results are not normal for all users, your experience may vary.
Posted by
Steve from College DownTime
One of the things Windows 7 is missing is the highly popular stack function found in other operating systems (I refuse to type them). I prefer my desktop to have easy access to commonly used programs, but I also do not want the desktop cluttered with dozens of icons. A few icons on the desktop are perfectly fine, but I'm no Jabroni when it comes to cleanliness. Therefore, I went on a virtual quest in search of the perfect method of using stacks in Windows 7.
I wanted stacks and I wanted them to look awesome. Too many folks had screenshots of stacks in weird places, like above their toolbars, off to the side, or even free floating around the desktop. This did not suit my purposes well. If it cannot look decent, I would not bother.
Luckily I found a way. Now, there are a few programs that can create stacks, which are essentially shortcuts listing other shortcuts:
Win7Stack,
7stack, and
Piles for Windows to name several. I prefer Win7Stack as it has a simpler interface and it lists icons in a smoother interface. It is also extremely easy to use your own icon image instead of pre-programmed Windows icons. Find one of the above you like, download, install, and move on.
Next you need to make your stack folders. Each program needs you to make a folder with all the shortcuts in it first. Name the folder whatever you want it to show when you click it. I have folders called
Office, Adobe, GIS, CAD, Toolz, Maintenance, and
Game time, each with their respective shortcuts. Also, include your icon file in each folder as well. I store all my stacks in a folder called
Stacks in
My Documents, along with some
Start orbs as well.
Now it is time to make your stacks. Find your stack folder's and icon's path, then click "Create link on Desktop," or the equivalent on other software. Mess around with the the different styles to see what you prefer. I prefer the default settings as they are simple, unintrusive, and smooth.
That is it for today's post. Remember to have the stack icon image you want to use converted to .ICO extension. PNGs might work, but not as well as ICO. Tomorrow we will show you a couple tricks to formatting stacks onto the toolbar.
Posted by
Steve from College DownTime
You have a minute, right? Good, because that's all it will take to change a piece of your Windows 7. Specifically, the Start Orb. It's that windows logo button you click on to get to the Start Menu. To change it, all you need is a neato piece of freeware called Windows 7 Start Button Changer, oddly enough. It's a standalone program, so there's no installation, just click. Easy right?

Grab some BMPs or PNGs from deviantART. People make these buttons all the time, so the options of customization are huge. I myself use a smiling skull! After classes, take a few minutes to browse through a few pages and download a folder's worth. You'll need a selection because any time you change your wallpaper, you'll want to change that button as well, trust me.
Now click the changer, select the BMP/PNG file you want to use, and click Change. Bam.
Any time you want to change the button though, it's recommended to click Restore to Default first, then switch images. It's just a safer switch. No need to create a Restore Point unless you're paranoid though.
Below are the sites to get the program and the images. It's that easy. Get to it!