Showing posts with label DiY. Show all posts

Quick Fix for Laptop Failures - Cable Shorts


To think it only took a half hour to fix, and caused hours of discomfort. Yes, the only thing bugging my laptop and preventing it from starting was a cable short, specifically the touchpad cable. Somehow the wires had separated from the plastic casing and were burning a few wires they shouldn't have been.

Knowing is half the battle, be prepared and remember cable shorts are irritating as all hell.

Writing for Fun - and Cash!

It has been a little while since I last wrote an article for CDT, but that doesn't mean it has been a while since I got paid to write!


I had heard of Fiverr before, but I never took a look into it. Let's face it, if you have a real job you probably do not need the extra cash from doing cheap gigs. But since this summer's jobs were scarce for what I was applying for, I convinced myself to try my hand at Fiverr.

As older readers of this blog can probably tell, we at College DownTime enjoy writing. The little twists, allusions, and general personality our articles have should tell that. Well, did you know people actually pay for that personality? Me neither before the other week!

All you have to do is make a quick account, describe what you will do for $5, and advertise it a bit. Typically, the first hour is the most important one for your gig. If you get a sale within that first hour, you know your gig will be profitable. Try getting as many pageviews as possible as well for your gig. Try tweeting it with the hash tag #fiverr for more hits.

I picked a topic I know quite well, League of Legends articles and information. Surprisingly, plenty of people with blogs and sites want LoL content and screenshots. Considering the time spent, the pay is fairly decent as a part-time gig. Try it out if you want a few extra bucks for a bottle or two a week, there's hardly any risk except to your ego.

Going Fishing? Bring Ketchup

Yes, ketchup does work wonders for a quick fishing trip. There isn't much to it. Say for instance, your lure and hook are a little dull. That's bad, you think to yourself, the fishies can't see my death grasp.

I know! I'll clean it with some polishing chemicals. No, you will not. Those chemicals deter fish from going anywhere near your lure. That's bad.

Use ketchup fellows. The slight acidic composition will clean off anything on your rod. I mean anything, previous bait, catches, dog biscuits, dollar bill residue, anything. Plus, it leaves your lure tasty fresh for future catches.

Just a couple packets in your tackle box and you're set. Or don't and sit in that lake wondering why the fish won't bite after you irradiated their environment with your cleaning supplies.

Beer Bottle Caps and DownTime

You were aware of your drinking habits years ago and until recently, you did not know how to express them to others. Especially folks you just met who have no idea your idea of a fun time is, well...gee, I can't remember. I know it had something to do with something.

Time to actually do something with those bottle caps you were collecting for three years. Stop chucking them at one another in an attempt to see who can fit the most in the bowling ball girl-boobs.


Ideas we will most likely be putting to use next semester:

1) Making a doormat. Arrange the caps in whatever design you want and decide if you want to put them into the ground, embed into a carpet-like material, or make a resin mold. If you really want to make it interesting, use a few bottles in the design as well.

2) Make a beer cap curtain. You know those cheesy, beaded curtains every Hollywood fortune teller has? Yeah, make one out of beer caps and cord. All you have to do is drill two tiny holes in each cap and string it through. Or be lazy and duct tape them on, I will never know.

3) Make a poster. Arrange your bottle caps in a design, get some resin, smooth out the surface and put a picture hanger on it. Done.

4) Play checkers. Paint half black, half red. Voila! You have a checkers set now.

5) Switch out your bass guitar tuning pegs. Take two of your caps, superglue them together, covering the peg. Works best with a bass, but a regular guitar might work if you're careful.

6) Play cards with them. Note: This works with Pabst Blue Ribbon only. Collect the whole set!


This will probably have secondary posts in the upcoming semester, so cheers to the beginning! Stay sharp y'all.

Making Mead Once Again!

Back with my cattle once again. While I was away, I left my last batch of homebrew mead (honey wine) to finalize its alcohol-making processes. Well it's been two weeks since I started it, time to test how it made out.


Quite decent. After two weeks, most of the fermentation has stopped. There is still minimal bubbling, but not enough to affect the alcohol content too much, especially since the yeast used is your basic dry yeast. In fact, the slight bubbling seems to give the mead a slight carbonation flavor and texture.

After bottling the batch (took a boatload of patience let me tell you), I loosely capped each off since gas buildup might still occur. The next couple weeks will be interesting to see how it settles out.

Recipe:

5 gallon glass jug (classy this time, right?)

5 lbs honey

1.5 gallons water (roughly, in actuality it's probably slightly less)

2 packets dry yeast

That is absolutely it. This mead was an attempt at a pure-mead, one without any extra ingredients or flavorings. At first taste it is quite sweet since our ratio of honey : water is higher than before. If you want to see our other recipes of previous meads, check them out here.

Over the next couple weeks we will post pictures of the mead settling and how to tell when it is clear enough to serve. Cheers!

Making the Blocks for the Plastic Bottle Raft

Well after three days of nine-hour volunteering, I will take the time to put together some up-to-date information on how the reusing experiment is going. I wanted to make blocks of bottles in order to easily lay them together, assemble, and store. Since I am a college student and I do not have the foresight to know how duct tape will work, I automatically assume it will hold together anything I use it on, so why stop myself now?


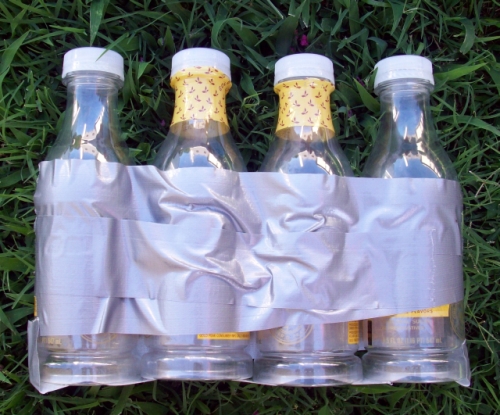
The above picture is a pile of all the blocks I put together. Similar size bottles were grouped together, organized, and then tightly taped. Well today I found out duct tape slacks up a bit, so I might have to do a bit more research and taping.

The plan this weekend is to make quite a few more blocks and test some layouts. Twice as many blocks are probably going to be needed ASAP, so I will probably be seen biking around town acting as one of those angry environmentalists. You know what? I'll just wear an oversized tree-shirt (get it?) and munch granola bars.

There has got to be a better, yet cheap, alternative to duct tape. Time for a smoke and a thought. Seacrest, out.

Reuse Plastic Bottles - Build a Raft

No, we aren't talking about this plastic ship, that is waaaayyyy too complex. Nope, the idea here is to make a raft, or possibly a couch, out of old plastic bottles and containers with nothing more than duct tape, maybe some wire, and rubber cement. This is a bit of a long-term project, so for now I'll just show you how I began the project.


First, you have to get a boatload of bottles. This can probably be done in a day if you walk around town. Or, if you are like my family, you consume so many bottles you have a separate trash collection can called "recyclables," but is in fact simply used to store post-consumption waste. Clean them out and get ready to seal them off. If you don't feel like cleaning, you can still make a raft...a raft of uncleanliness!

I use rubber cement on the bottle threads and then twist it shut. Rubber cement has got to be the best glue for most of CDT's projects. I use it for all purposes, not just projects. Pens are so hard to hold onto, so just apply a little to your digits and profit!  That bowl of Cheetos just will not stay on your belly? Apply a little to your pectorals and profit! Hungry, and there is just nothing that can satisfy your desire for an amorphous, flammable liquid? Stop. Do not taste it, not without a little salt first.

Sometimes you will not have the caps, because let's face it: remembering is hard. If it was easy, I'd remember some allusion to something historical and make it sound witty in this sentence. Therefore, I found the best way of sealing off topless bottles is to get some duct tape, tear off a strip, and then seal up with hot glue. Seal the glue all around the bottle top's edge making sure it is waterproof. Or not, and let your raft sink, it's not like I care.

One attempt today is to figure out how to seal together several bottles to make pieces I will use to assemble the raft. I need to make larger pieces of similar sizes to get some consistency in the assembly, otherwise it just takes too much time taping each piece together individually. Let's see how it goes. Cheers, and good luck.

Stealth Drinking Part 3 - Hide Your Flask

Holy cow, you still need more ways to drink stealthily? You might actually have a few problems. Fortunately, we could care less about your problems and instead we are going to focus on drinking. Let's get to work.


Today's Stealth Drinking post is a how-to on making a secret flask book. It is shown in movies, comics, and cartoons constantly ("No wonder they call it the good book" - Homer Simpson drinking from a flask hidden in a bible). You might have thought they were clever and that it takes a God-blessed genius to craft one. Well, you are a God-blessed simpleton to think so. Do you have a few minutes? Sure you do, you're on the internet.

1) Get a big book. You will need at least 300 pages (1" of paper). Find a big book on clearance at your library for $.50 and be done with it. I found an old Ozzy Osbourne biography book that was not getting any attention.

2) Glue the pages together on the outside. I used rubber cement, as the brush strokes leave the edges clean. You could theoretically use any regular white glue, but why man? Rubber cement keeps the pages bendy while holding them together!

3) Put your flask on the book and outline it. Then start cutting away. I used a regular utility knife without a straightedge. It shows. If you want a pro-looking book, use a straightedge on every cut. Keep cutting out pages until your flask fits in the crevice and the book closes properly.

4) Sand out the inside. You took the time to make it, you might as well make it look decent. All those tattered, cut hang-nails look terrible. If you tried to impress me with that shoddy work, I would laugh in your face and ask your sister if she's doing anyone anything tomorrow night.

5) Apply a layer of glue inside the book along the cut edges. This will keep the pages intact even more and make the overall product bearable to view. You know what? Apply a couple layers. These things tend to fall apart. Do it.

Last tips: Choose an uninteresting book to desecrate. If you have a strong hatred towards an old textbook, go for it! Won't it feel awesome tearing out those pages and then hiding your booze from anyone with a conscience? 

If you have a small bar area setup in your place, find an appropriate looking book to stand next to those bottles. It will class-up the place and you will appear more knowledgeable, because we all hate those book-smart, history-buff bar crawlers always trying to one-up your wits.

Good luck and be smart with your stealth drinking. We know you are out there, but no one else has to. Keep it that way.


Check out our other Stealth Drinking posts Part 1 and Part 2.

Mead Batch #2!

Well we've definitely made more than two batches of mead before, but for our purposes here, it's #2. If you haven't checked out our first article of making mead, now's the time! This one is quite a bit more aged than most before it. It was made cheaper than those before. It is also quite drier than its predecessors, with only 2.5 lbs of honey per gallon instead of 4 lbs. Here are some quick stats:


- A 2 gallon batch with 5 lbs of honey total

- Several oranges, lemons, and a whole box of raisins were added for flavor complexity

- Two packets of Fleischmann's yeast

- Aged two months before opening

- Settled for another three weeks before bottling

- Currently about four months old


As you can see in the pictures, the yeast is settling out quite nicely, leaving a clear wine. It still has some settling to do, but that's not necessarily bad. Some folks like the taste of the yeast still in the wine as it tastes more like bread when it does. It takes patience to sift the mead through without taking the yeast with it, but it does clear up quite nicely when you do. That's about it for this batch folks. Any questions about a recipe or variations we will try our best to answer. Cheers, and good luck!

Grow an Herb and Tea Garden in Your Room

Your place looks boring now that you think about it. You don't want to buy more posters or furniture, and there are only so many black lights you can have in a household. Your place needs something to liven it up. Wait...how about something ALIVE to liven it up? Pets aren't allowed and fish die every time you get them. Plants don't die immediately after you touch them, so let's try that idea. Well since you have some spare time, why not take a look at a tea garden you can grow in your room/appartment? Let's have at it.


This post will help you make a decent, cheap mini-garden you'll enjoy. It won't take much work to manage and no more time than a Sunday afternoon to put it together. Plus, the plants can be dried out and then made into a tea, how wicked is that? Very.


Basics: You're going to want to buy herb plants to add to your basic tea leaves. In fact, since tea takes a long time to grow it might just be easier for you to buy the Camellia sinensis (standard tea plant) and just experiment with herbs. It would be an herb garden for tea, but if time isn't an issue then grow the tea!

Herbs: Chamomile (German), Mint, Thyme, Lemon balm, hibiscus, sage, bergamot, and catnip for fun

Hibiscus plants take around 3 months to grow and harvest, thyme takes no more than 2 months for our needs, mint grows practically instantly, chamomile takes 2 months, sage grows instantly and everywhere, catnip grows within a month, bergamot will be ready in 2 months, and lemon balm is between 2-3 months

Catnip is a fast growing, weedlike plant that is similar to mint, but with the added bonus of making your cats go ecstatic. If you do have cats, make sure they don't roll around in the plant you're turning into tea.

Rose hips is another plant that is great for tea, but takes time. If you have roses around your place and know the caretakers don't spray the plant with pesticides, pick a few unless you want to wait a year for the next harvest.

Now decide which ones you want since you're on a budget and then plant all of them in containers with enough surface area - typically a pot with 1ft diameter for most of the herbs. Gallon containers work fine, but you don't need depth for these herbs, just room to grow out. You'll be harvesting them shortly anyway. All these things need is a full amount of sun until harvest and make sure the soil is always moist. Don't drown the herbs, except for the catnip and mint.

Time's up! Pick leaves from each plant (the hips if you have a rose plant) and dry out. Microwave them for instant results, press them between books with paper towels if time isn't an issue. Once dried, grind them up into mixtures and serve.

Experiment with c-c-c-combos. I usually get tea with bergamot in the ingredients list. Bergamot has an awesome orange flavor. Mint, thyme, and lemon balm as a combination is also pleasant. Make yourself some catnip tea one day and pour some for your cat for hilariousness to ensue. Add every herb together if you want a real experience.

Serve at any get-together and feel the pride roll over you as your guests drink your brew.

Wine / Mead Making! Make Alcohol for Less than $10-15!

You've heard about it from your crazy, eccentric uncle plenty of times and now you want to learn how to do it on your own. Well we've tested wine making quite a few times and have come up with a cheap way for you college students to do it also while still leaving you with beer money for later. At the end of the article, check out the pics of our mead from last semester.

Below are the ingredients and prep you'll need to start your first batch. However, the most important factor in making your very own wine is patience. A decent batch takes about a month to ferment and settle, while an above-average batch will take at least six weeks.


Now we're starting. You'll need:
1) A one gallon jug of the cheapest water you can find. I prefer ones with huge caps because it'll be easier to stuff your ingredients through and takes less time to pour out later.

2) Your main sugar. Yeast eats sugar and leaves alcohol as its waste. For mead you use honey. Essentially any sugar-water content will work, but honey is typical for home brews. This is your most expensive ingredient as well. Don't buy any fancy honey unless you want to impress others, it all ends up the same. Grape juice works, as well as any other high-sugar juice. Just make sure you don't use juice with preservatives (anything with sorbate, nitrate, etc. listed)

3) Your flavor additives. I've used oranges, lemons, blackberries, raspberries, raisins (ALWAYS INCLUDE RAISINS - they're already fermenting!), and cherries. High-sugar fruits work great as they give more food for the yeast. Experiment with fruit combos too. Raisins and lemons are almost standard, but I prefer more tart fruit for an awesome flavor.

4) The yeast. Dry-packet yeast is great and for $1.25 you get three packets. Protip: use specific wine yeast for better alcohol content and flavor.

5) Random flavorings/yeast nutrients. You can buy Yeast Nutrient anywhere specialty foods are and it is also available online. It is not needed, but it can turn a decent wine into something great. However, tea is a great alternative. Yeast likes tannin and tea is full of it. Plus, the tea adds some complexity that will impress wine appreciators, should you show off.

All this stuff is available at any average dining commons on campus, except the yeast. If you live in campus dorms, wear a jacket or bring a pack. You pay for the food, why not use them to make yourself some tasty libations?

Ready to brew? I thought so. Grab your gallon jug, dump half the water into a container for later (you will need it to top off the batch). You will need 3-5 lbs of your sugar-water substance, like honey, maple syrup, molasses, etc. More sugar = a sweeter, stronger wine. 3 lbs honey per gallon is a little dry, but 4 lbs is perfect for a normal batch. I usually use 4 lbs. If you're using a juice instead of honey, fill the gallon jug up almost all the way, about 75% full.

Heat up the sugar before adding the yeast. It starts the fermentation faster. You want speed right? Now is also a good time to activate the yeast. Put a packet of yeast into a glass with warm water and let it sit for ten minutes. Done yet?

Toss your fruit, tea, flavorings, and anything not-yeast into the gallon jug. Make sure it's warm, not boiling. Shake it up a bit, mix it around. This makes the flavor consistent while the yeast eats it. Top it off with the water you were saving until it's at the fill line.

After mixing, finally add the yeast, man! Put a cap on and shake that thing up. Shake some more, and then let it sit with the cap off. Within an hour you'll get a nice foam building up (that's the CO2). Put the jug on some paper towels because it will start spewing out over the next few hours. Once you're confident it won't leak much anymore (three hours later), put a balloon on it with a hole punctured in the balloon to allow CO2 to escape.

Protip: you're in college and might not have balloons lying around. Use a condom. They're just lying around not being use, amirite? Ha, well just stretch one over the jug's cap and pop a hole when it fills with CO2.

Now just let it sit somewhere it won't be disturbed much. A closet, shelf, on top of your old books you can sell, where ever. Now wait a couple weeks and enjoy. Just about all the alcohol is created in the first 2 weeks, but more time = better tasting. But who am I to tell you when to drink? Let the dead yeast settle after fermenting and you'll have a clear, great tasting wine you just made.


                                       Enjoy you classy, crafty college students.